Overview
Facebook is a powerful platform to market your products and services.
While many business owners are using Facebook pages for their marketing and advertising, they are neglecting another highly effective tool for building intimate relationships with their prospects and customers.
In this blueprint, you’re going to learn how to create, run and grow your own Facebook group, and how you can turn the members into customers.
How Can You Use This?
- You can use this blueprint to create a Facebook Group.
- If you have an existing group, you’ll learn how to grow your Facebook Group.
Tools And Resources
Creating a Facebook group is pretty straightforward and easy.
However, nurturing your Facebook group and leveraging on it is something that many business owners do not know how to do properly.
This is why we created this blueprint to help you create a group that can help your business grow.
What You Need To Know?
A Facebook Group is a platform for users who have the same interests can interact with one another by asking questions and sharing information.
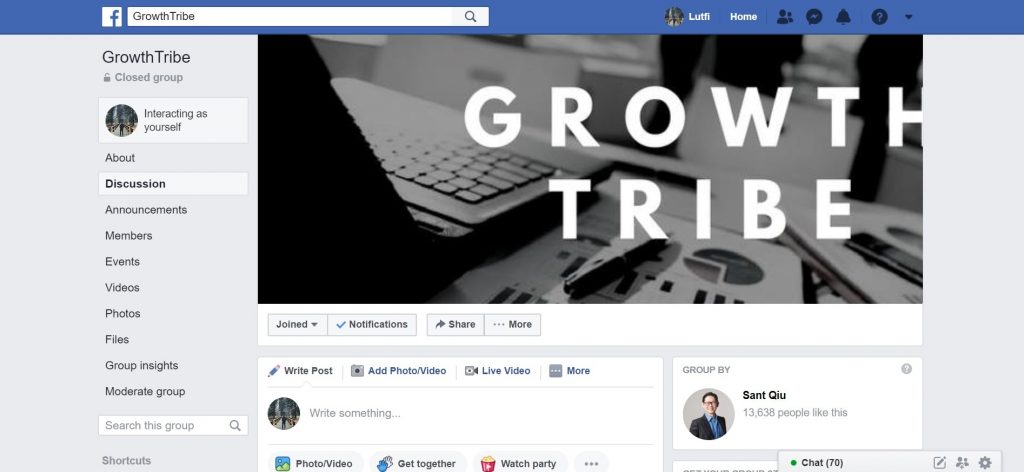
Our Facebook Group, GrowthTribe is for business owners who are interested to learn about any business-related topics.
Any member who has any questions about running a business can post them in our exclusive Facebook Group (https://www.facebook.com/groups/GrowthTribe).
Engage Your Customers
A Facebook Group also allows members to get together to carry out a variety of activities.
This includes sharing related content, posting photos, organising activities, exchanging views on issues, discussing the shared purpose and merely getting together for a common cause.
On top of the above, any Facebook user is allowed to create a group of their own, so you don’t need to set up a Facebook Business Manager account first.
Improve Understanding Of Customer
By creating a Facebook Group for your business and continually engaging your customers, you’ll have a better understanding of their desires and the challenges that they are facing.
This is crucial in helping you to improve your customer avatar. We covered this in our ‘How To Create An Ideal Customer Avatar’ blueprint.
Creating, Testing and Improving Offers
When you understand your customer better, you’ll gather data and feedback straight from the his experience.
Using this information, you can come up with insights that can help to improve what you are currently offering.
The information can even help you to create new offers that you never thought your customer may be interested in.
Pre-launching a new offer to members of your Facebook Group is a good way of testing whether the offer resonates with your target audience in the first place before you launch it to the public.
In our ‘How To Create An Irresistible Offer’ blueprint, we shared with you how you can create offers that are attractive to your target customer.
Purpose
Facebook Pages enable public figures, businesses, organizations and other entities to create an authentic and public presence on Facebook.
On the other hand, Facebook Groups were designed to be a platform for group communication and for people to share their common interests and express their opinion.
Default Privacy Settings
Facebook Pages are visible to everyone as they are set to ‘Public’ by default.
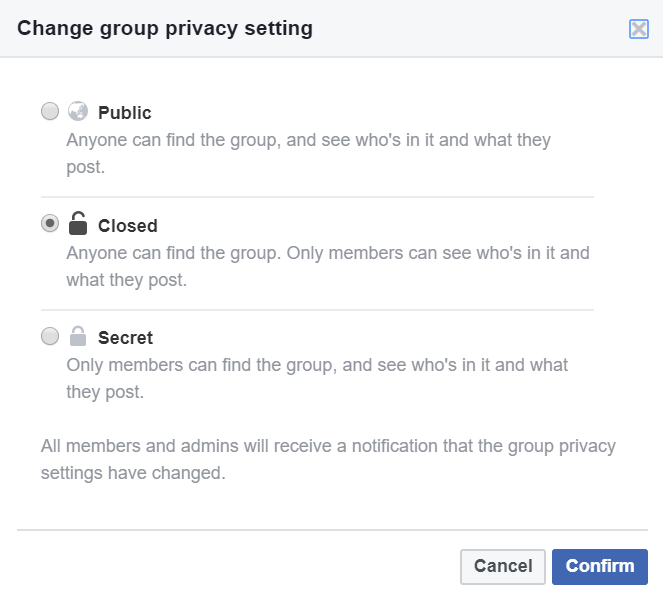
In contrast, the default privacy setting for Facebook Groups is ‘Closed’.
Nevertheless, you can still set your group to be ‘Public’ so even non-members can see the posts there.
There is even a ‘Secret’ privacy setting for Groups such that non-member Facebook users can’t even search for the group nor can they request to join.
This means that non-members can only be added by invitation either by the admin of the Group or its existing members.
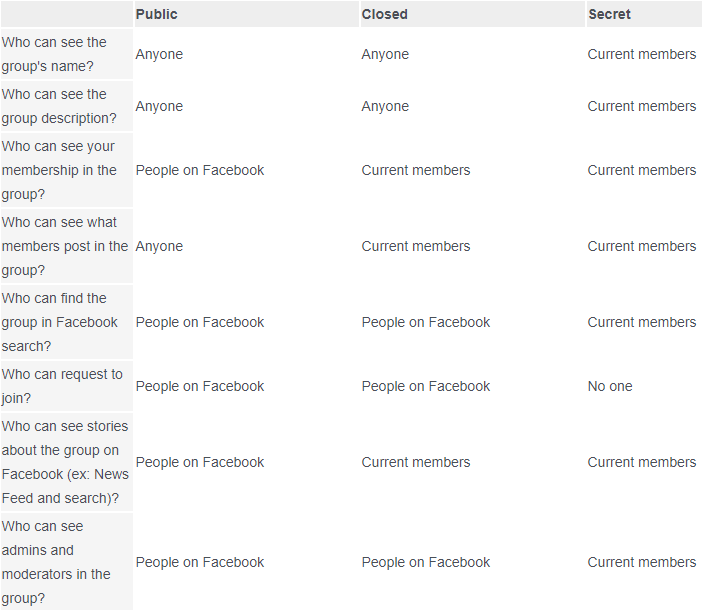
The table below summarises the different characteristics of different types of Facebook Groups:
Facebook Page
A Facebook Page is more directed and suited as a marketable representation of a company or someone who is famous. With pages being verified for authenticity, it shows credibility to the everyday user.
Well-known brands like McDonald’s have been known to leverage this platform. Users who have connected on this page would be able to receive new and reliable updates, announcements as well as notifications from the company.
On top of the differences, there are a number of pros and cons associated with both platforms. We have compiled a list of the good and bad – but not limited to, between a Facebook Group and a Facebook Page:
Facebook Group
Pros
- Built-in analytics (Group Insights)
- Communication with members of the group is generally easy and fairly manageable with options such as chat, wall posts, emails, and messages.
- Personalisation settings are more flexible in groups as they are generally created by individuals without the presence and representation of established brands.
- Promoting an event is possible in groups but not pages.
Cons
- Groups are generally difficult for users to find unless they are existing members or have a friend who intends to join.
- Whatever content there is in the group, it will only be notified to members of the group. This singles out other users who are not aware of the group but may have the same interests as the group. The target audience is very limited compared to a Facebook Page’s.
- Groups are generally a bad platform for businesses to showcase products as its potential audience reach pales in comparison to that of a Facebook Page.
Facebook Page
Pros
- Built-in analytics (Page Insights)
- Pages make better marketing tools for brands or personalities when they publish new content as it is designed to be more in line with a personal profile.
- The personalisation aspect offered by pages allows the admins to engage with more users and fans. Thus, elevating the level of communication.
Cons
- Generally, admins need to monitor pages very closely as it is more open when compared to groups.
- It is harder for admins to manage undesirable comments posted by users as the number of users/members is larger than that of groups.
- A lot of spending is required to boost the marketability of the page as it is difficult for it to grow organically.
Given the different specifications of the two, it is entirely up to the individual to decide which platform suits them best.
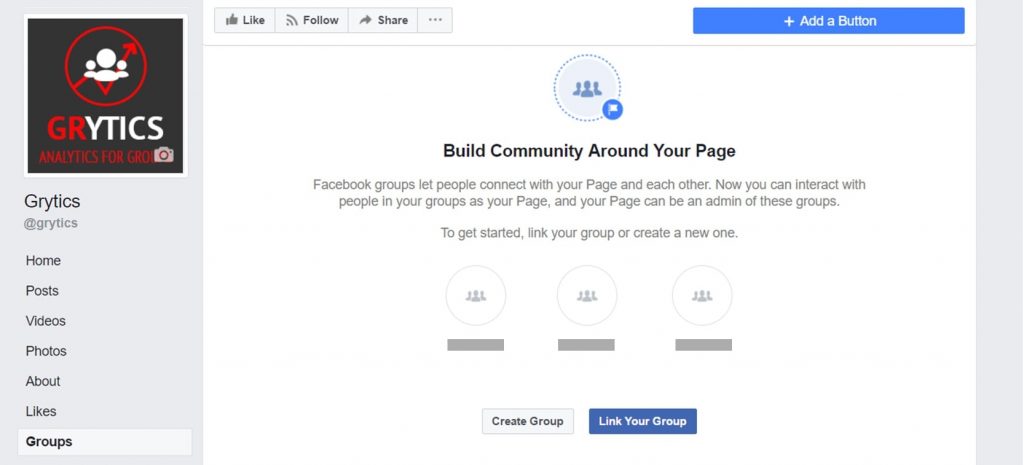
Recently, linking your Facebook Group to your Facebook Page has been made possible – making it ideal and versatile to have both platforms, depending on the direction an individual would undertake.
How To Create Your Very Own Facebook Group
Go to https://www.facebook.com/.
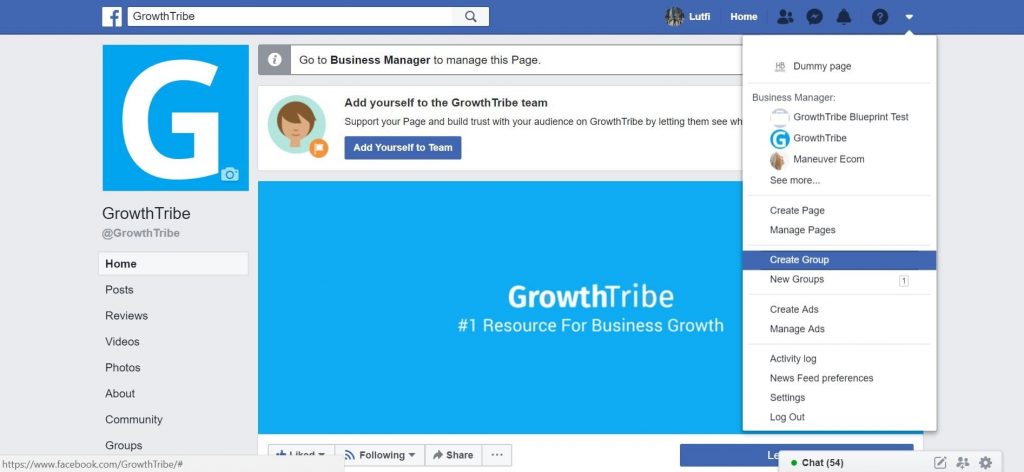
Login to your personal account and select ‘Create’.
Under the drop-down menu, select ‘Group’.
You will be prompted to fill up basic information on your group such as:
- Name of your group
- Friends or users you intend to invite
- Privacy setting (Public, Closed, Secret)
- Icons (You can skip this step.)
Fill up the name of your group and add at least 1 friend to the group.
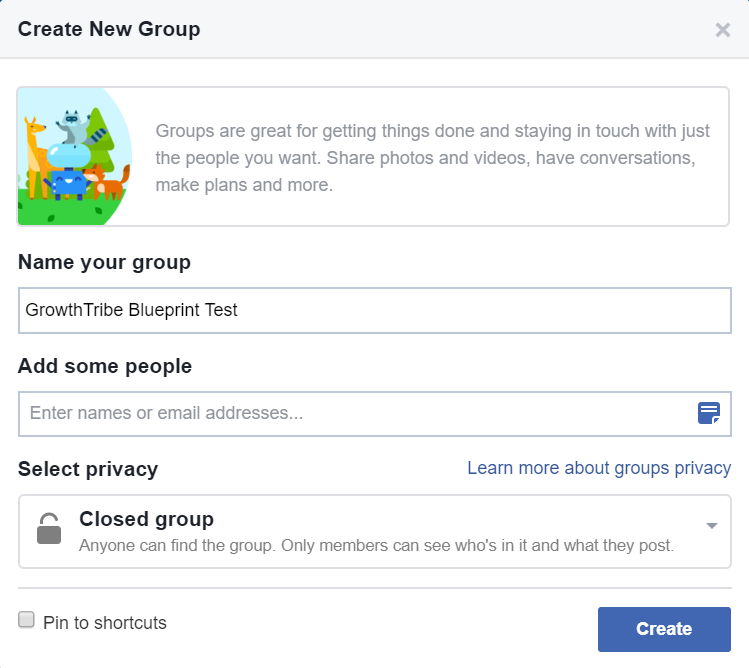
As you can see the default setting is ‘Closed group’. You can change the group settings.
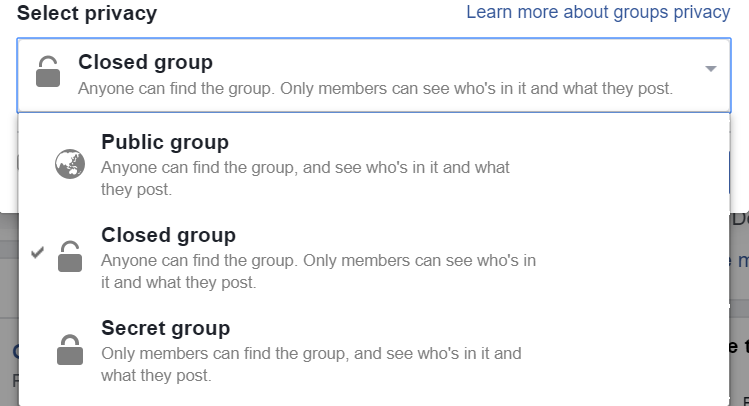
Once, you’ve selected a privacy setting for the Group, click ‘Create’.
Then you will be redirected to your Group that you just created.
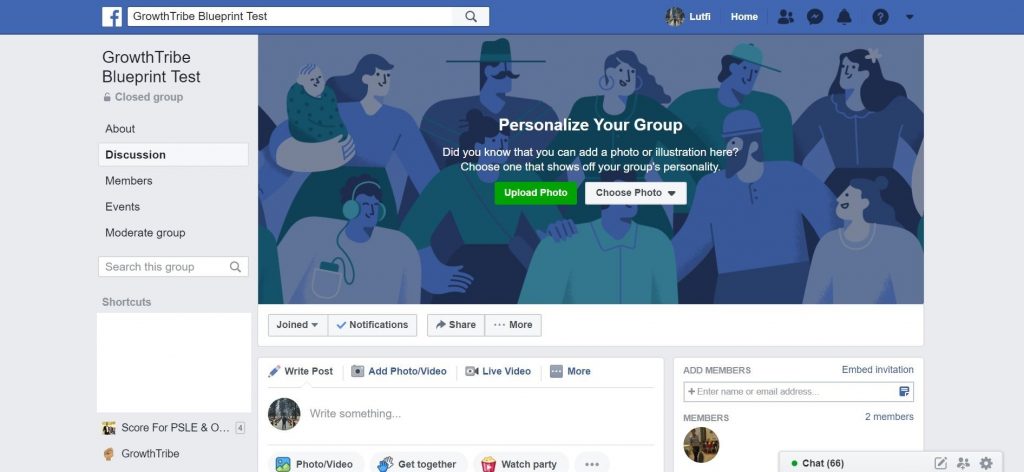
Click on the green ‘Upload Photo’ button and select the photo that you want to use from your computer.
The recommended size for group cover photos is 1,640px by 856px (or 1.91:1 ratio).
The diagram below illustrates the dimensions of the cover photo.
Facebook recommends not placing important information in the gray areas, as group visitors may not see the entire image on a mobile device.

In our ‘How To Create Attention Grabbing Ad Images’ blueprint, we introduced Canva as a free and easy to use photo editing tool.
You can also use Canva to create a cover photo for your Group.Go to www.canva.com.
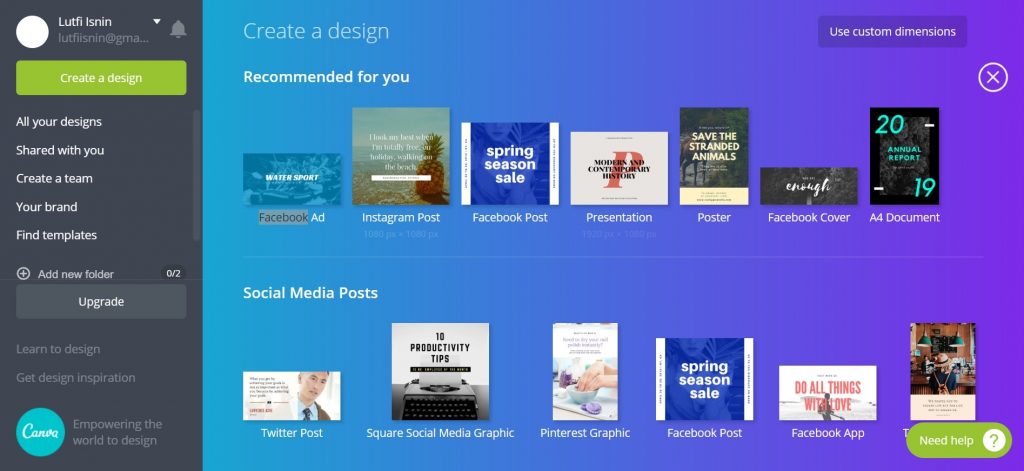
Click ‘Use custom dimensions’ at the top right hand corner.
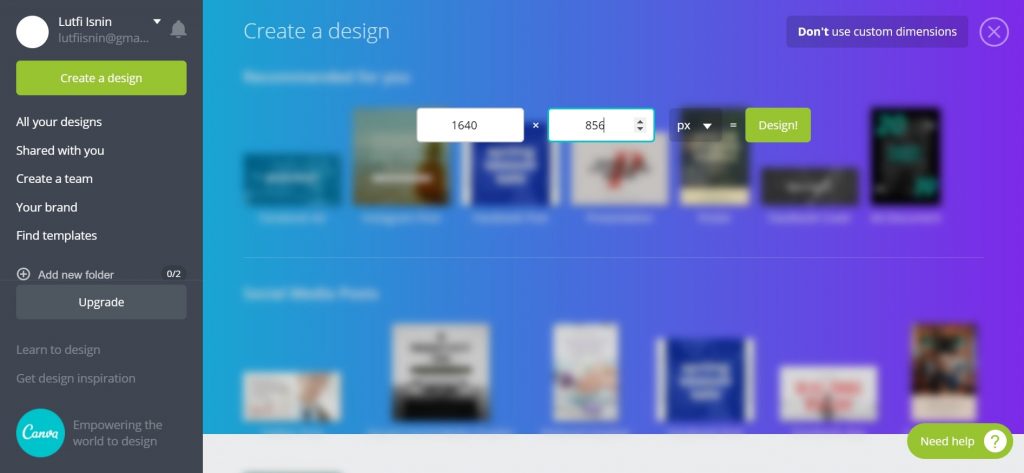
Enter the recommended 1,640px by 856px dimensions and click ‘Design!’
You will see a template with the customised dimensions that you can use to create the cover photo for your Group.
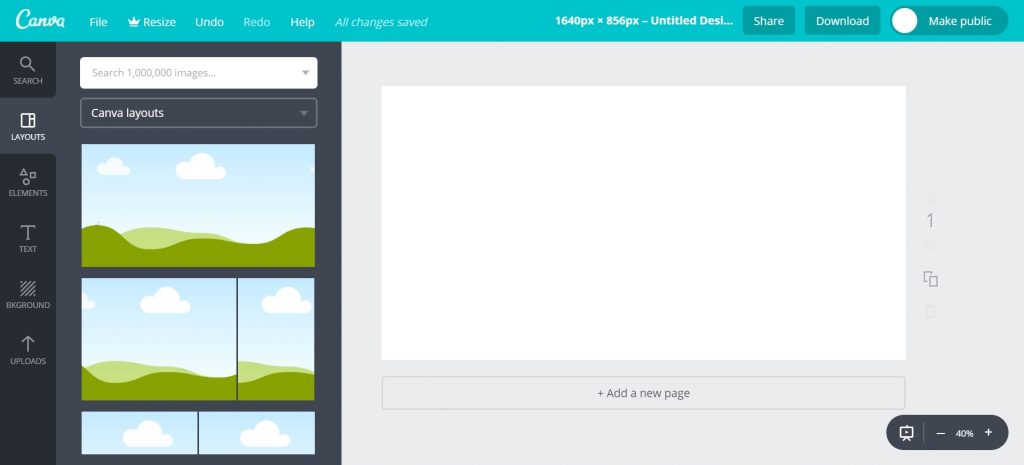
You can then follow the rest of the steps in our ‘How To Create Attention Grabbing Ad Images’ blueprint.
Click on ‘••• More’.
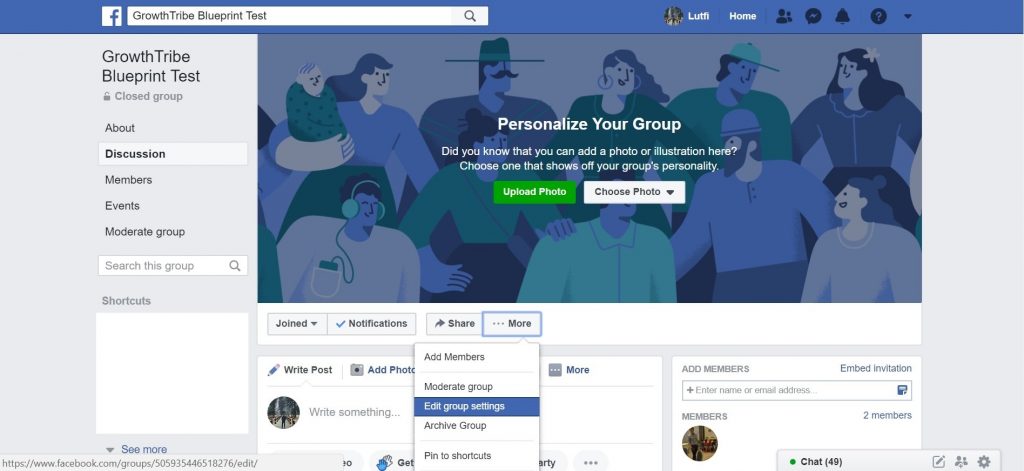
Click ‘Edit group settings’.
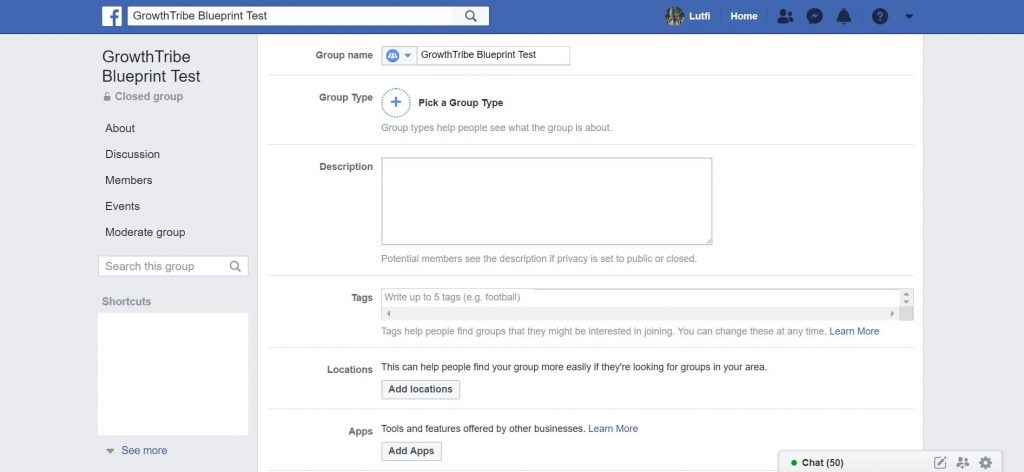
Select your group type. This will inform current and potential members of what your group is about.
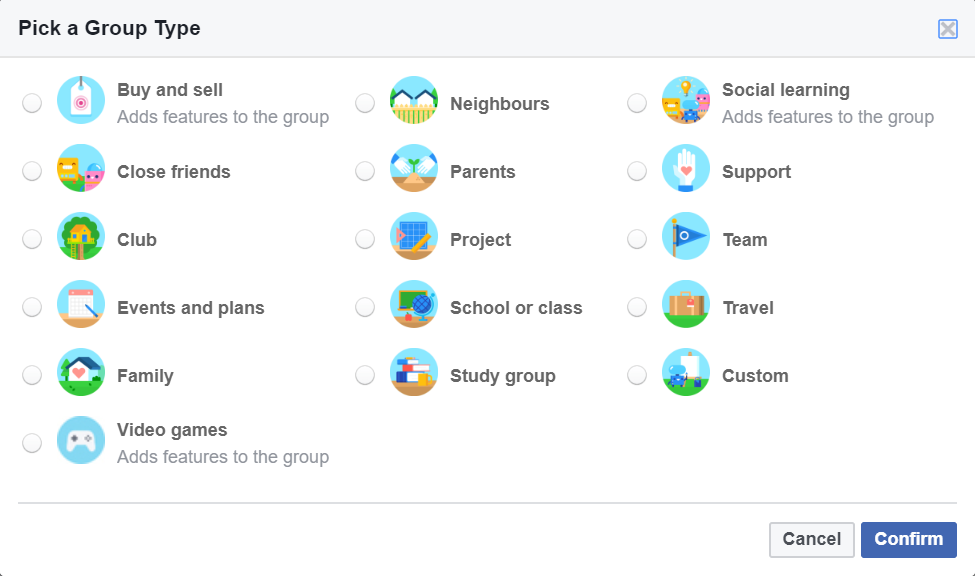
Click on the blue ‘+’ to pick a Group type then click ‘Confirm’.
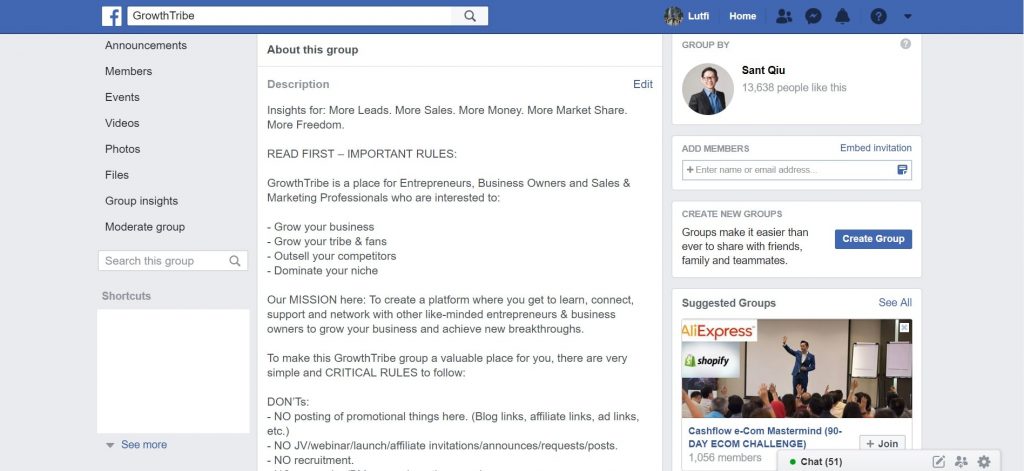
You should write a description of your group to let them have a clearer indication of the direction you are undertaking. Here is an example of a description from our GrowthTribe group:
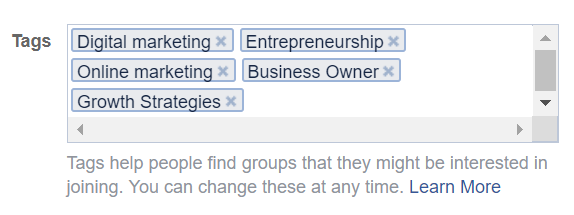
Then select up to five tags to aid you in making your group more discoverable either through search or Facebook may even recommend your group you users who are members of similar groups.
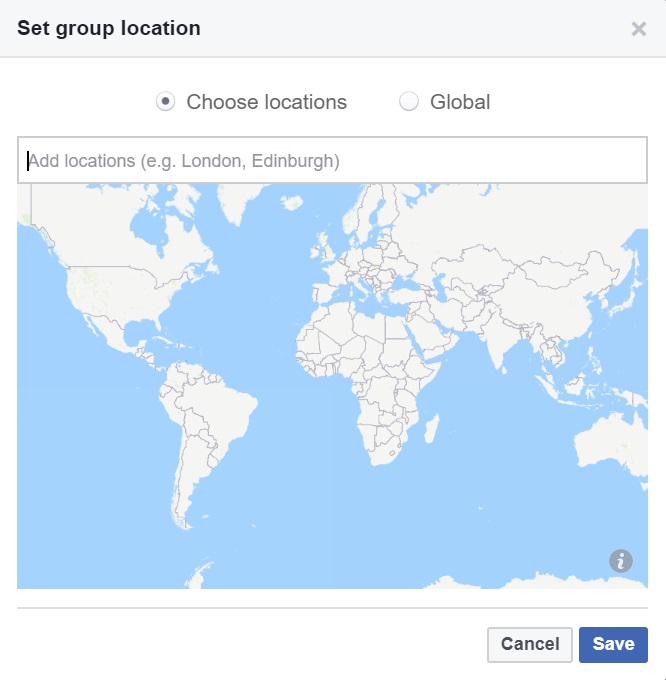
Next, add a location to your group. This will inform potential members in knowing where your group is based at.\
Click ‘Add locations’.
Type in the location of where you Group is based at. In our example, we’ll select Singapore.
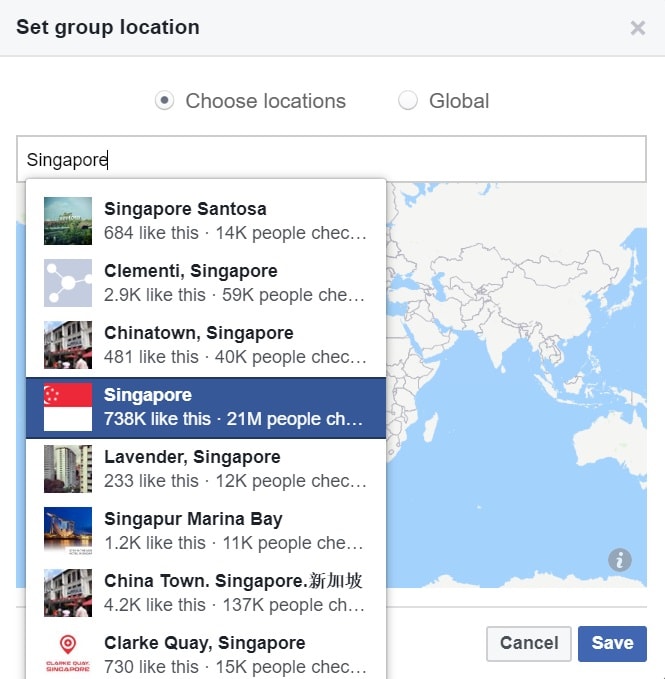
Click ‘Save’.
If you have a Facebook Page, you can now link it to your Facebook Group.
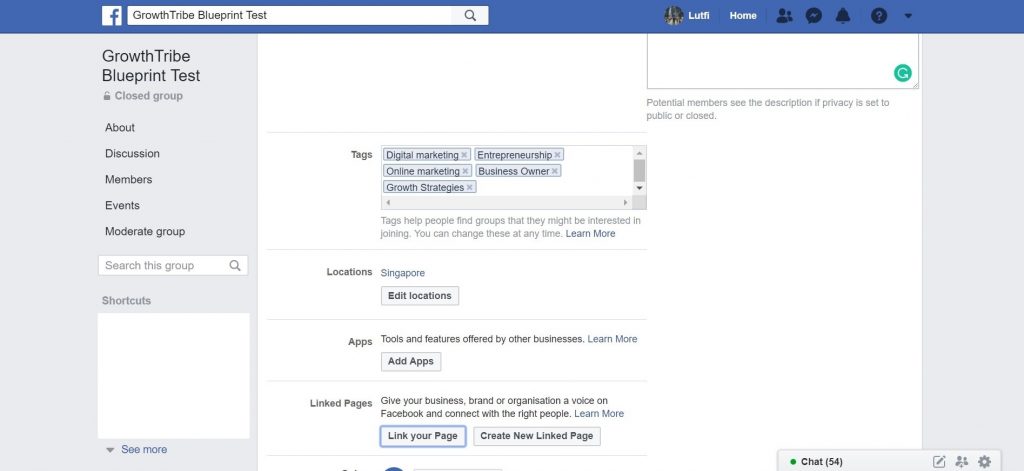
Click ‘Link Your Page’. You will see all the Pages that you manage.
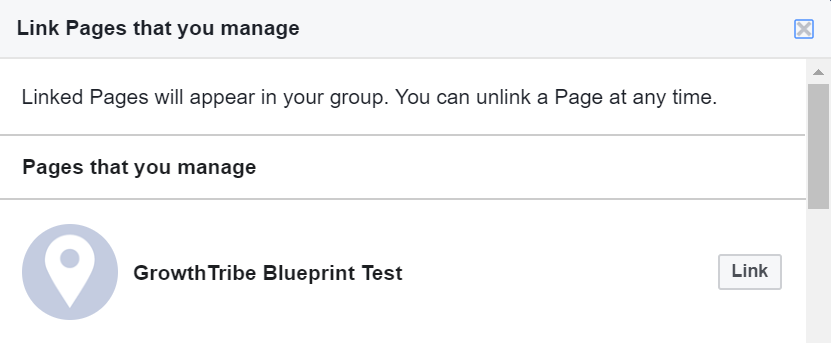
Click ‘Link’ on the page that you want the Group to be associated with.
By doing this, you can create a call to action button on your Facebook Page to get visitors to visit and join your Facebook Group.
On top of that, your Page will be able to manage the group and create posts. The group will also be listed on your Page. You can unlink the two at any time.

Click ‘Link Page’ then scroll down and click ‘Done’.
You can also customise your URL and remember to keep it short, sharp and sweet. This is to help you and the group members easily remember the link.
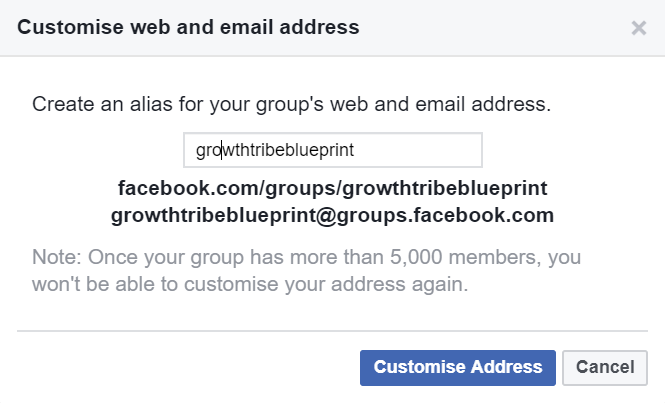
Click ‘Customise Address’.
You can also change the privacy settings of your Group.
When new users request to join your group, you can set it such that only admins and moderators have the power to approve.
On the other hand, you can also allow current members to approve new requests.
We recommend you go with the first option so you can control the quality of your members.

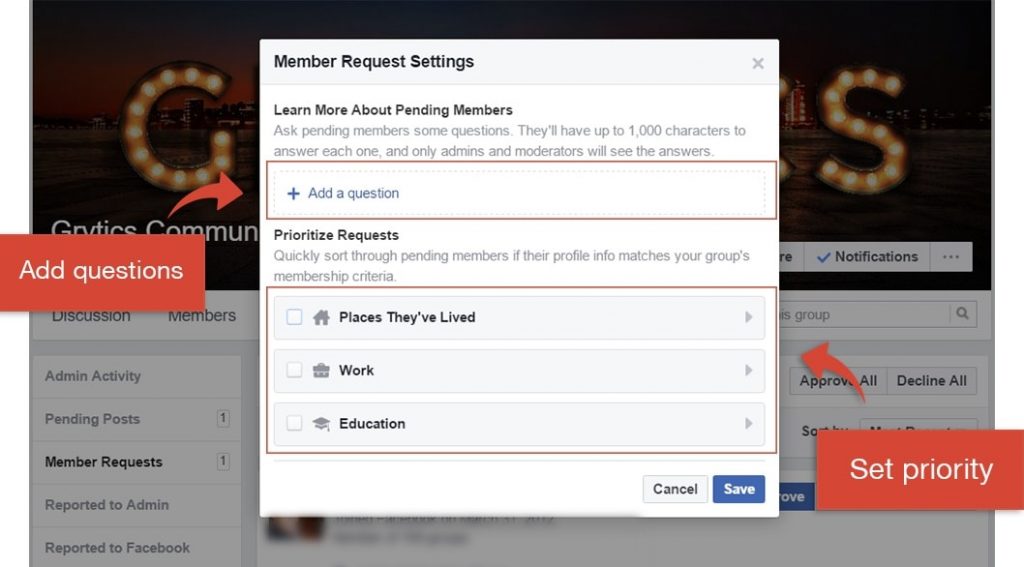
You can add another layer of quality control by adding questions.
This means that whenever a user requests to join your Group, they will have to answer a series of questions first. They’ll have 250 characters to answer each question.
Then admins and moderators can review their responses and decide if they want to approve their request.
To do this, click ‘Ask questions’.

You’ll see the ‘Membership request settings’ below.
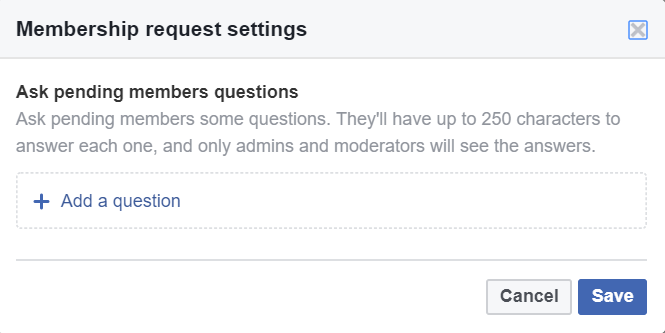
Click ‘+ Add a question’ to create new questions.
Here’s an example of some questions that you may ask:
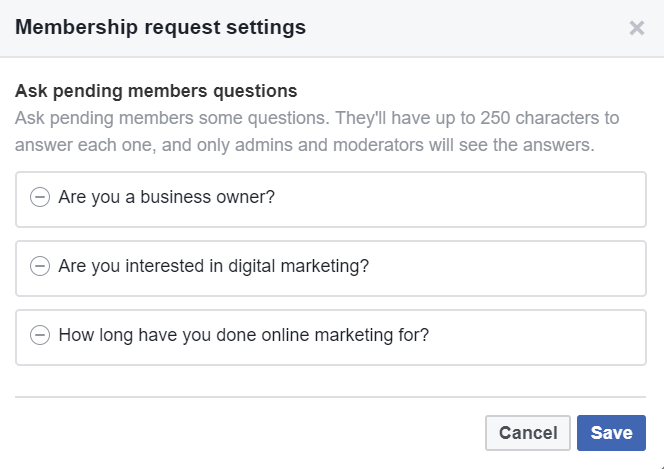
Click ‘Save’.
Lastly, you can also edit the posting permissions by members. This allows you to ensure that the content posted in the group is relevant and not spam.
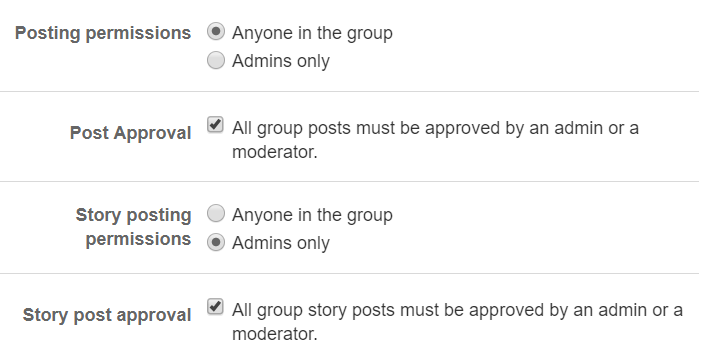
Click ‘Save’ to save all the updates and changes you’ve made to your Group information and settings.
Now that you have created your own group, the only thing left is to add friends into it! This refers to your Facebook friends.
You can add members by clicking the ‘Add members’ button on the right-hand side of your group page.
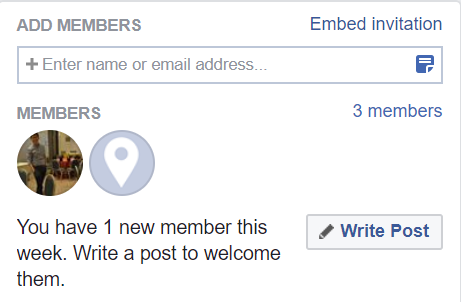
Enter their name and select. This would automatically add them into the group without the need for their approval.
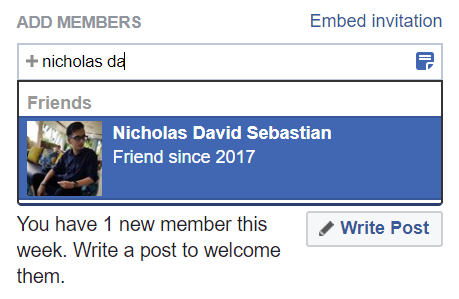
You should only do so if you know your friends are interested in the sort of type your group is.
If you are unsure, you can send an invitation for them to accept or decline by entering their email.
Also, by clicking on the blue icon in the “enter name and email address” text box, you will be able to add a personalized note as you can see below.
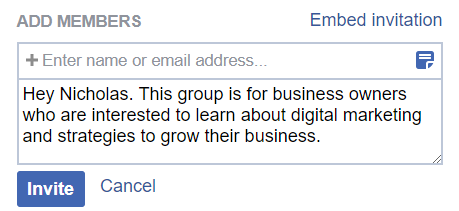
Click ‘Invite’.
How To Grow Your Facebook Group?
To improve the quality of your members, you should only add friends who will be interested in the scope of your group.
This will help you get more representative data in terms of aspects like engagement, responsiveness and feedback/information.
Therefore, you should not automatically add all of your Facebook friends.
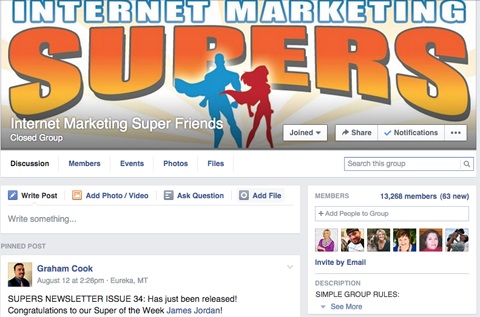
The best way to go about increasing your membership is by sending your Facebook friends an email or Facebook messenger.
If they are interested, they will accept your invitation.
You do not want a situation where you end up with spammers in the group.
Therefore, only members who have a genuine interest in your business should be added to your Facebook Group.
You can ensure this by adding questions that new requests have to answer and by putting stricter post settings that require your approval.
Any other posts not relevant to the group’s notion should be deleted and those inactive users or spammers should be removed from your group.
Recently, Facebook allows you to change the CTA button on your Facebook page.
So instead of just sending a message to you, there are other actions that you can suggest to visitors to make.
Go to www.business.facebook.com.
And click on your Page in your Facebook Business Manager.
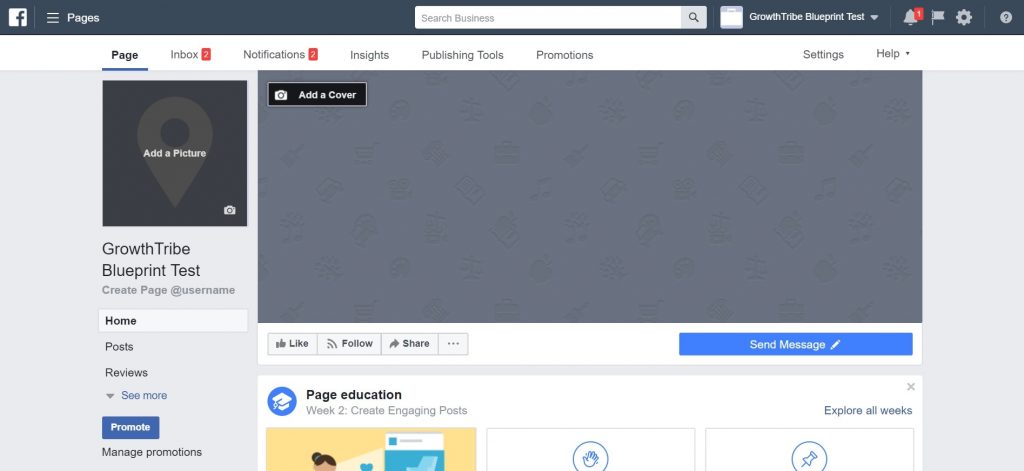
Click the ‘Send Message’ button. You’ll see a ‘Add a button to your Page’ window.
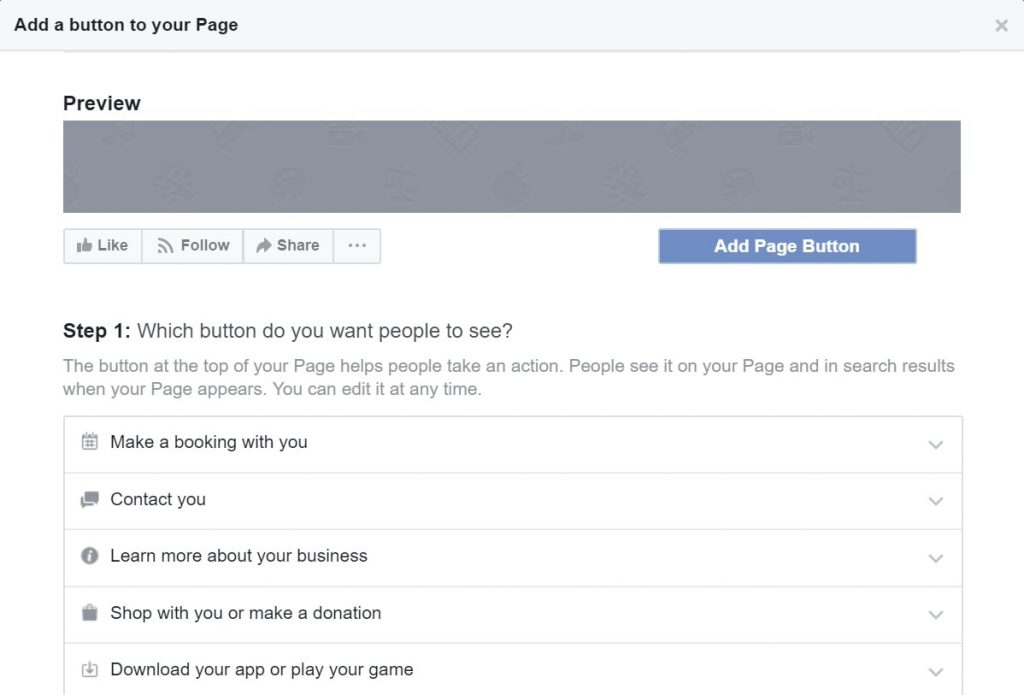
Scroll down and you will see an option for ‘Join your community’. Click it and select ‘Visit group’.
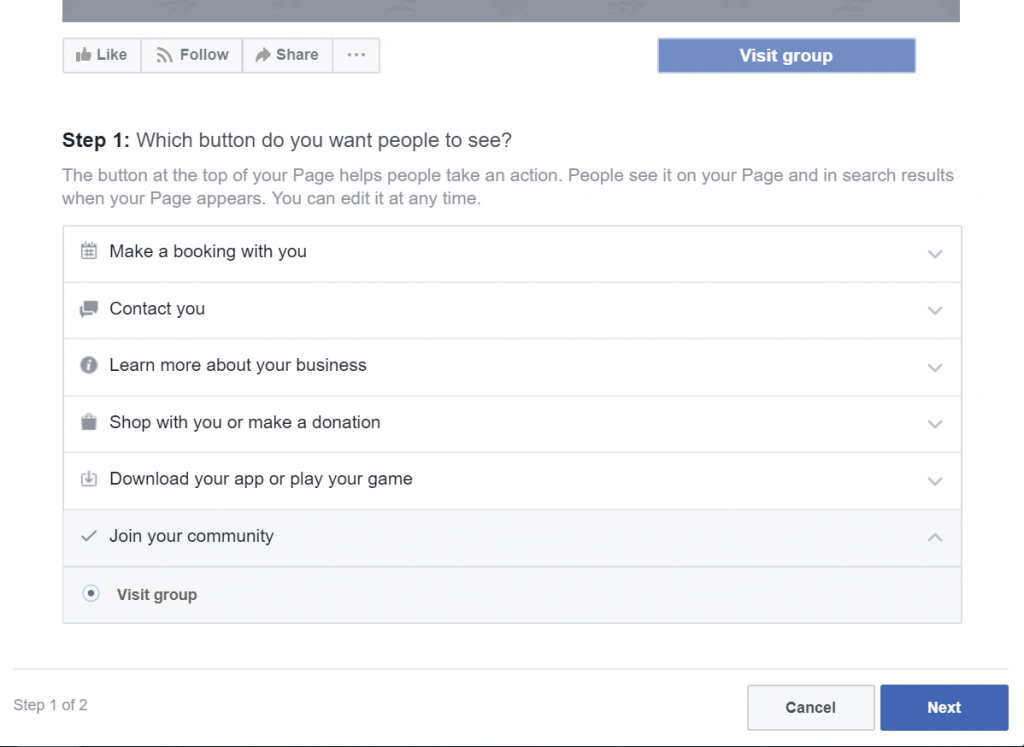
Click ‘Next’.
Click ‘Select one of your groups’ then click on the group that you’d like your page visitors to go to.
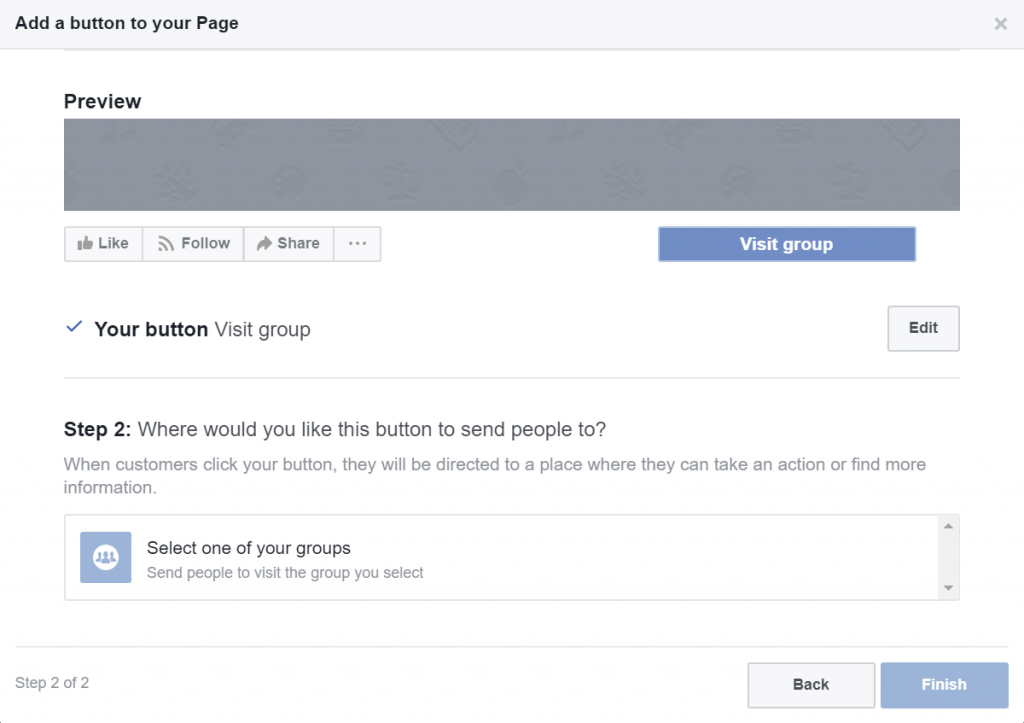
Then click ‘Finish’.
On top of that, once you linked your Group to your Page earlier, your Group will be listed on your page.
You can view it by clicking on ‘Groups’ on the left hand side of your Facebook Page.
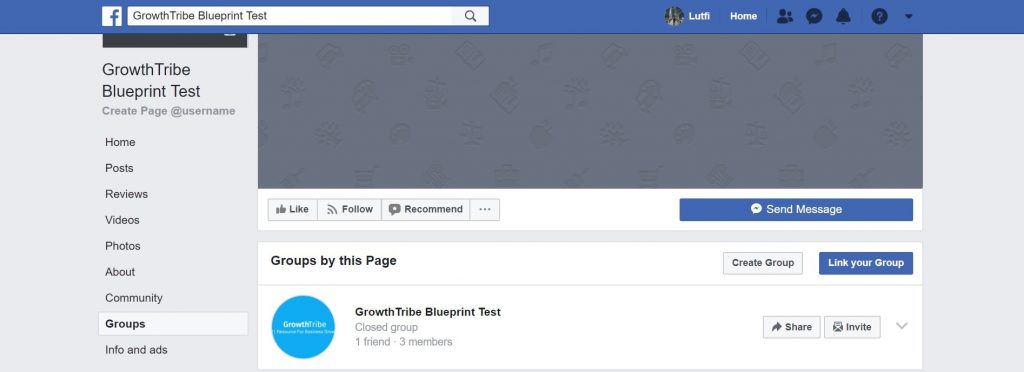
Do not limit your group’s presence strictly to Facebook. You can use your Twitter, Instagram, SnapChat and YouTube account to promote what your group is all about.
You can also promote your group on other social media accounts such as LinkedIn.
This would enable you to reach a range of users – from professionals to the everyday Facebook user.
At the very least, they will be aware of your group’s existence.
A single admin alone won’t be able to regulate and manage your business Facebook Group as you see a growth in membership.
You can allocate different roles to different people.
For example, one person can be in charge of reviewing responses of new requests.
Another person can be reviewing posts by members before approving them.
Another person can be tasked with replying comments.
And so on.
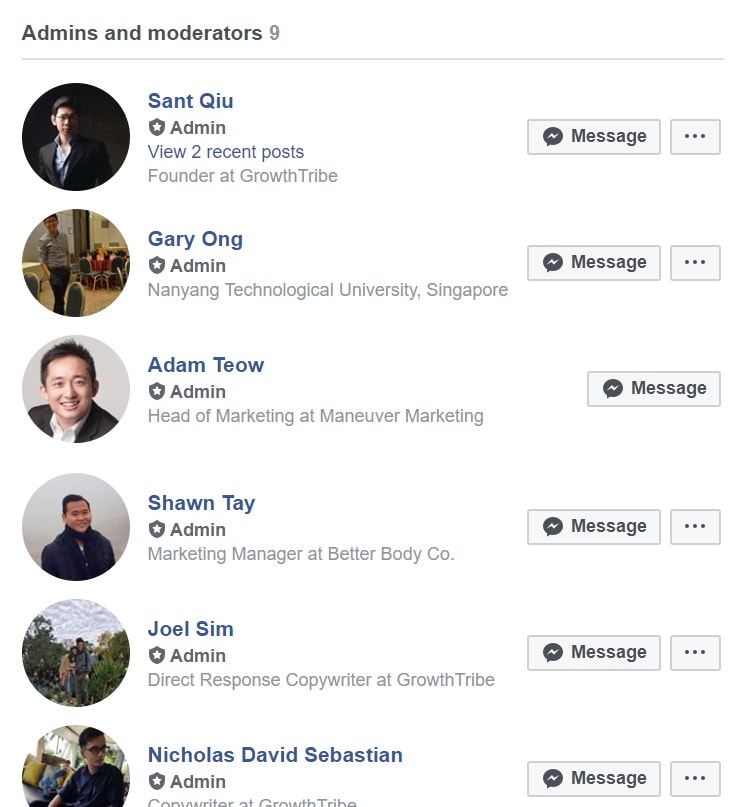
Thus, a team of admins and moderators will be useful in helping you to manage a Facebook Group.
Therefore, gather a group of your trusted buddies who are interested in the group that you have created just like in the image below to provide you with the support to monitor conversations and siphon out any posts/comments that are not in line with the group’s guidelines.
These group of friends can also aid you by allowing them to approve membership requests from non-members.
For example, for our GrowthTribe group, we have multiple admins that play different roles in the management of the group as you can see below:
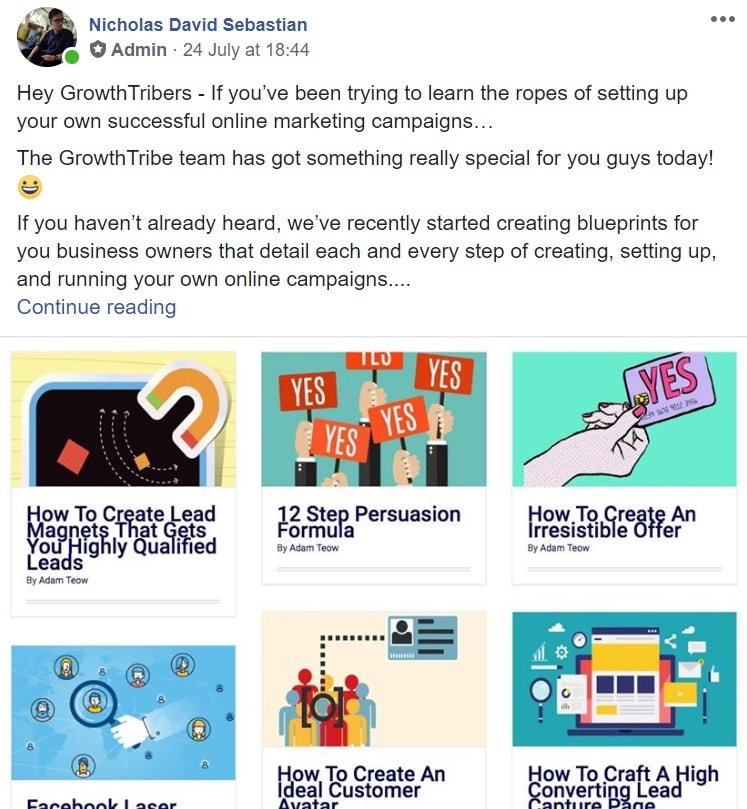
In the beginning, there might not be a host of post contributed by the members of your group. However, we recommend that you position yourself as an admin who is very responsive to every posts.
By regularly keeping tabs on the comments section and practicing methods such as curating exciting posts in advance, you will find that your community will gradually build on its own. They will inform their peers as to the content that you offer in your group and get potential members to be onboard.
Like a car that runs on fuel, the same principle applies here. Take good care of the group by deleting off any undesired posts to protect the group (maintenance) and publish exciting content to grab the members’ attention (fuel).
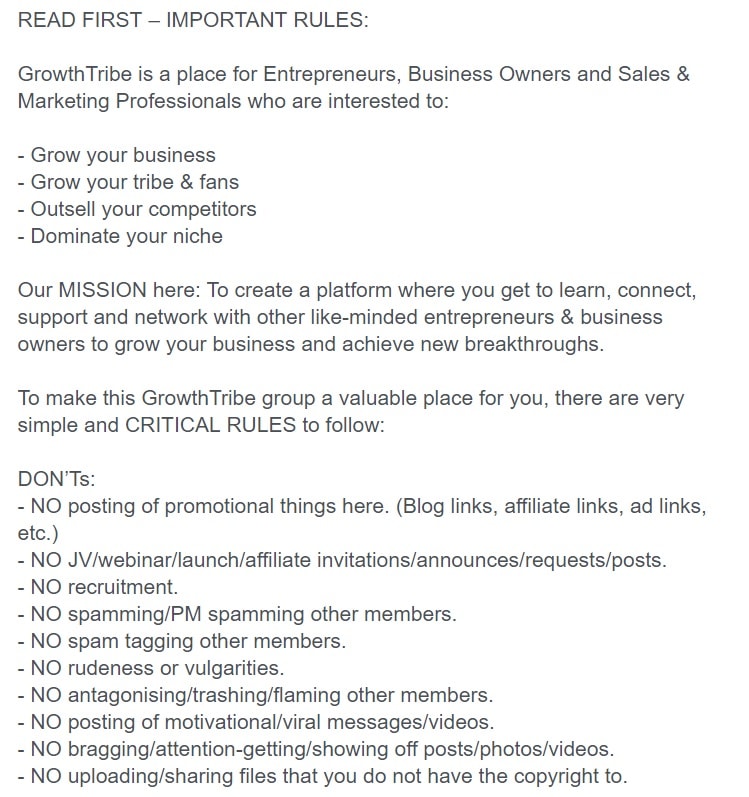
This is one of the most important aspects to growing your group. You and your team are required to decide what kind of contents in a post is allowed to be published by members.
You can also decide on whether promotions are allowed within the group. At this juncture, you direct the sail of your group. Try to be as flexible as possible.
Any members who violate the guidelines set by you and your team, it is best to terminate their membership as you do not want a hostile individual to wreak havoc or spoil other members’ reputation.
Here’s an example of some rules that we have for our GrowthTribe Facebook Group:
Once you have hit the 250 membership mark, you will be able to access Facebook Group analytics, or more commonly known as Group Insights.
This would enable you to keep accurate track on how your Facebook Group is growing in numbers.
It also allows you to identify the most engaged members and at which part of the day they engage the most.
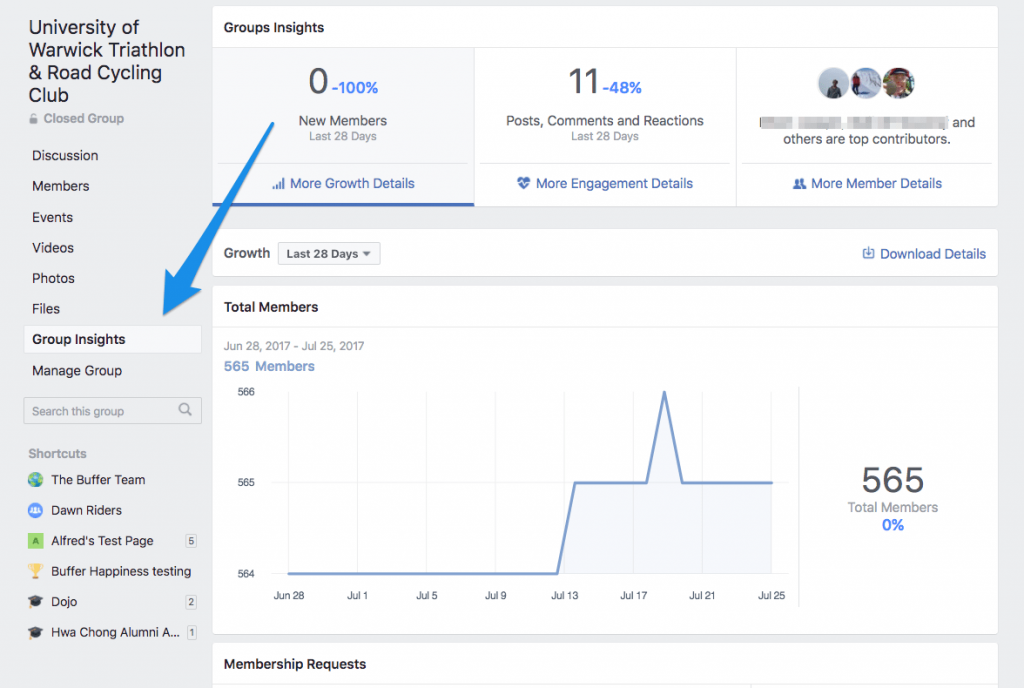
Below are several other insights you can get from this platform:
Member Details
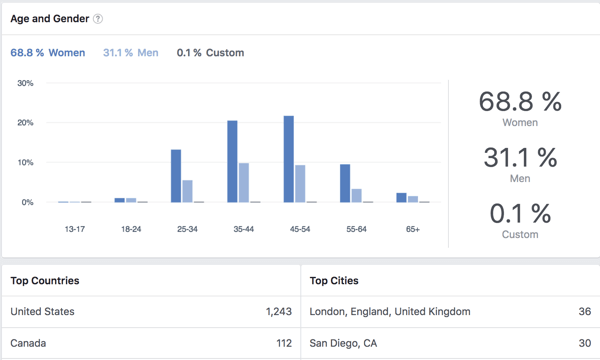
Here you can identify who are your top contributors, the percentage of men and women and top countries and cities.
The above picture illustrates the total number of members currently present, engagement details in a group.
Once you have the knowledge on these metrics, it is wise for you to actually post on when there is high traffic of engagement within the group. This will enable to boost participation amongst members.
You should also take the time to thank the top contributors as, without them, the success of your group would not have happened.
Growth Details
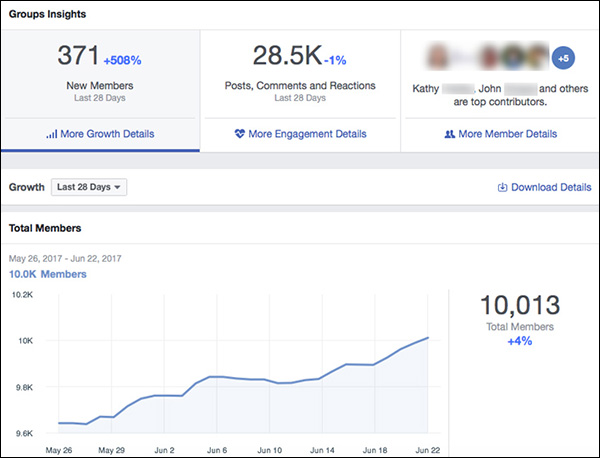
The above picture illustrates the total number of members currently present, engagement details in a group.
Once you have the knowledge on these metrics, it is wise for you to actually post on when there is high traffic of engagement within the group. This will enable to boost participation amongst members.
You should also take the time to thank the top contributors as, without them, the success of your group would not have happened.
Set a standard amount of times that you will be posting in the group on a daily basis.
You will need to be versatile and creative in this sense.
Members may get bored easily and quit the group if the content you display does not live up to the hype of the group that you created.
Use the internet as a platform for you to attain and grasp new ideas as you curate your content around the information which you have been fed with.
This is by all means, no easy task. However, it will definitely help your group expand in the long run.
Before researching for content to publish, you should be in the know of what majority of your members desire in a post.
When it is made known to you, write the post around those expectations. You will be surprised that members of the group will be more engaged as you are doing a service for them.
You can also use this opportunity to showcase what you are good at so that users would be enticed to collaborate with you in the future to contribute to the group.
Below is an example of the type of questions that our GrowthTribe Facebook Group members ask:
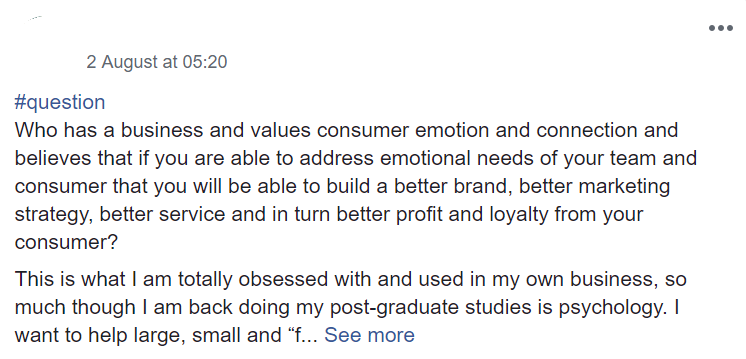
Hosting an event is a great way to get together and interact with members of your group in person. This will actually bolster relationships and connections that were made online. Group events might also encourage inactive members to partake.
There are many ways to host online or offline events. You can do so by setting up a Q&A session with your members (online) and host gatherings such as riding motorcycles, playing football and picnic (offline).
Below are examples of some events that we’ve organised:

What’s Next?
Now that you know how to create and grow your very own Facebook Group for your business, you’ll know how to continuously engage with your target audience.
You’ll also be able to leverage on insights that you can extract from the group to improve your offer or test a new offer.
If you want to learn how to create offers that are attractive to your target audience, you can check out our ‘How To Create An Irresistible Offer’ blueprint.


